
Sitting by the water and soaking up the view and the sun is one of the best things to do. When given the opportunity to do this, it means I don’t have places to be or things to do. It’s a time to totally relax, let my mind wonder, and daydream. My husband and I love to visit the Florida gulf coast and do just that, and the Seaside View images remind me of these times. Also, they are perfect for trying your hand at watercoloring, because the largest image measures about 3-1/2 x 2″. Use the watercolor painting technique with the Seaside View stamp images to create beautiful scenes for your craft projects.
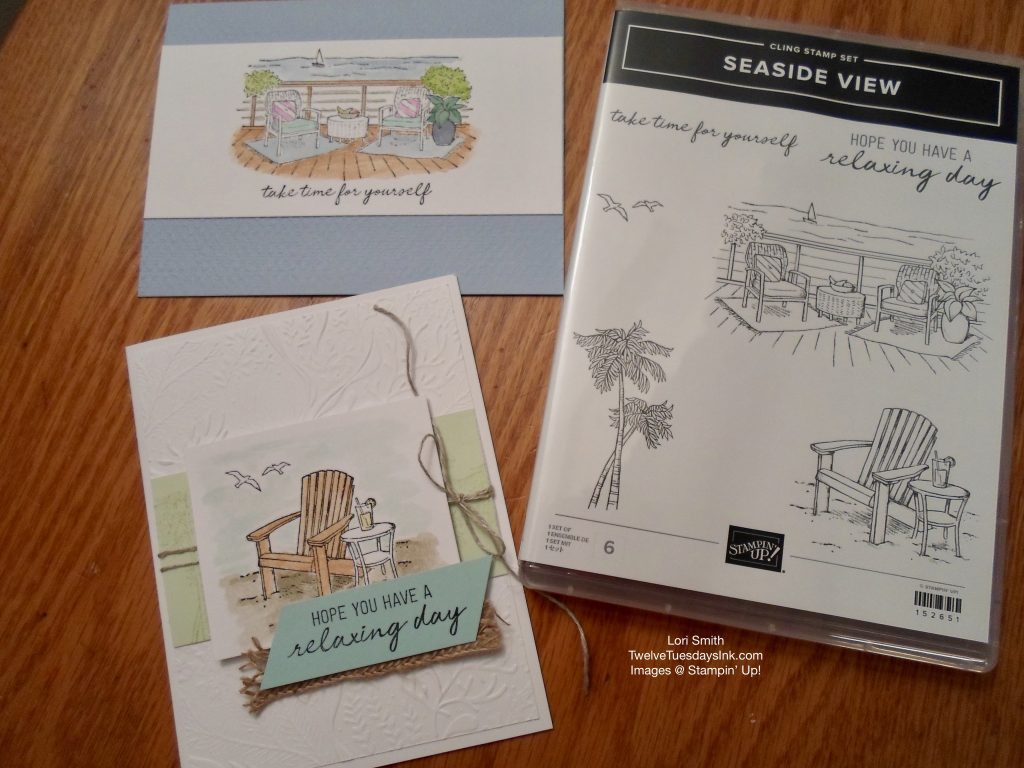
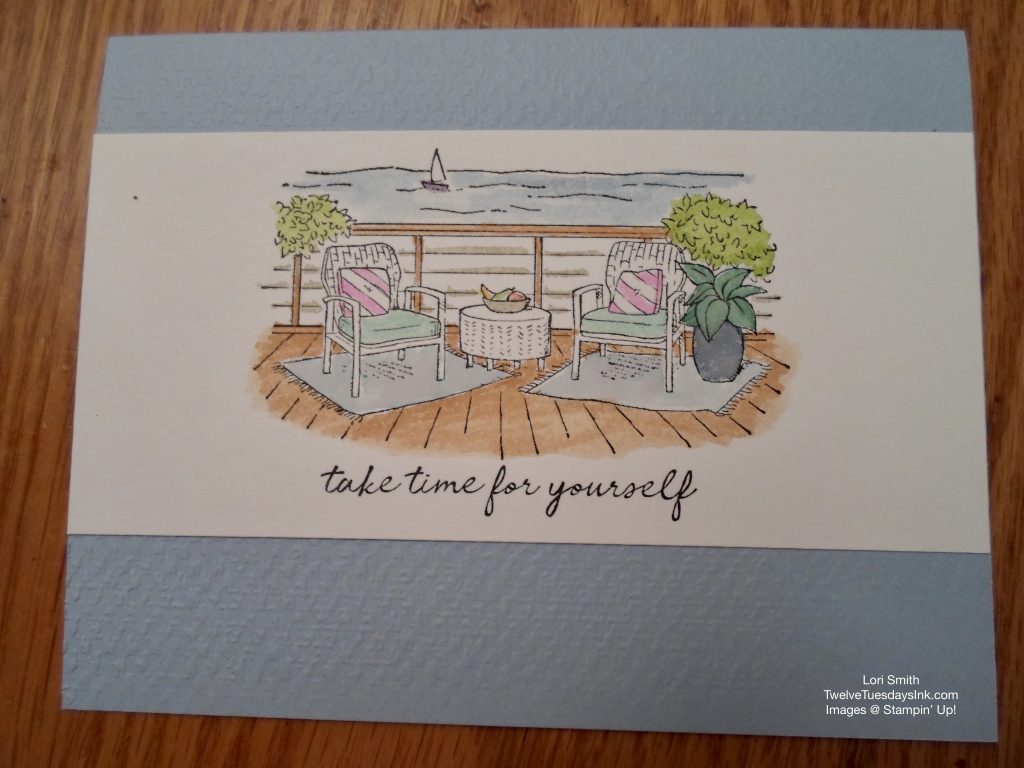
Our monthly stamp club isn’t able to physically meet this time, so I wanted to send them a couple of happy mail projects since we’re having a book party. For one of the projects, I prepared a few pieces for using the Seaside View stamp set by CASEing the example from the Annual Stampin’ Up! catalog, page 47. The example looks like the watercoloring technique was used to color the Adirondack chair in the sand.
Flashback to last week
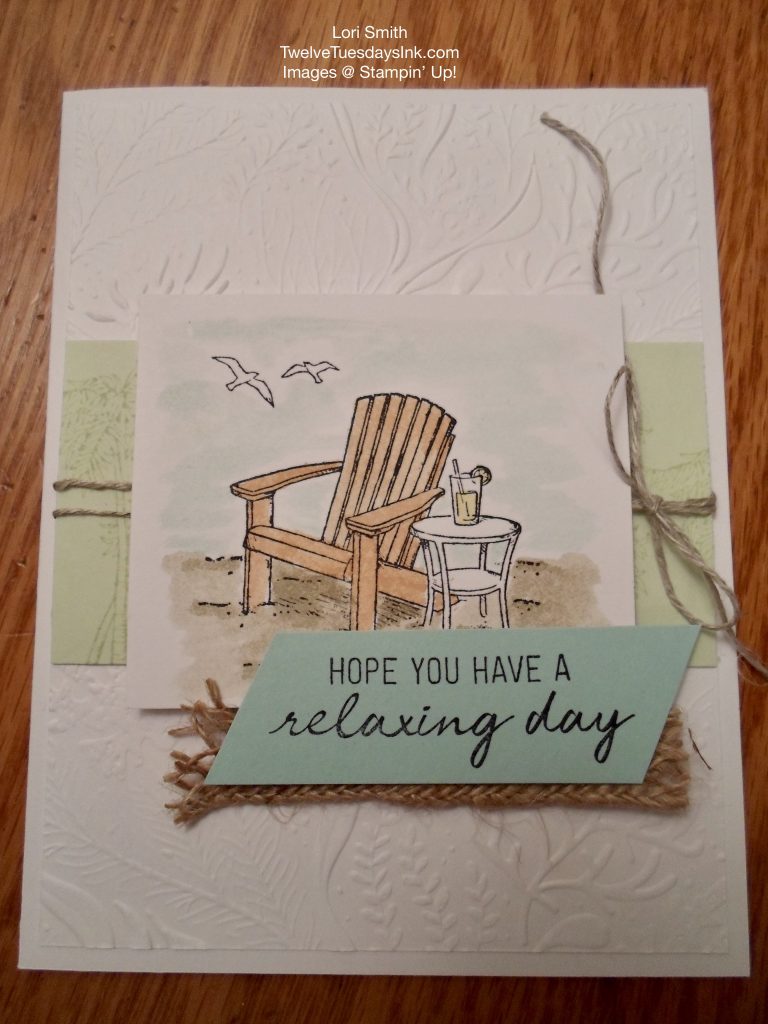
My friend, Connie, came to visit last week, so we could catch up on what’s been happening with each other and stamp! Since we had no definite plan as to what we were making, she suggested watercolor painting. I asked her if she’d be okay with us playing around with the Seaside View stamp set, because I had this in mind to make for our stamp club. She was game for it. So I cut regular cardstock, we dry embossed a piece with the Seabed 3D folder, we stamped, and then watercolored the image. We actually tried to copy, as best we could, the colors in the catalog example. (I did not take the time to look up the Stampin’ Up! card recipe – Smile). We stamped the chair image with Stazon Jet Black Ink, and the sentiment with Tuxedo Black Memento Ink.
Did I mention that Connie is very good at watercolor painting? She is. And me? I feel I can use all the tips and practice I can get to improve this skill. We dragged out brushes, water, stamp pads, and a rag for this. The colors we chose were Sahara Sand, Cinnamon Cider, Pool Party, and Daffodil Delight. I squished the ink pad to the lid before I opened up the stamp pads. Connie took a brush, and away she went. She dipped the brush tip in the water, then picked up a little ink from the lid to paint. I watched while she painted. My biggest take away from watching her was that I shouldn’t be afraid. Here’s how my card turned out, and Connie painted several more images to take home with her.
12 Tuesdays Watercoloring Tips:
- Use water-based ink when using StazOn Ink, then the colors will not bleed together.
- Since we used regular cardstock paper, the watercolor absorbs (dries) quicker into the paper. (Watercolor paper is more forgiving, this paper will be less likely to warp or pill if more water is used. For the amount of painting we did, we had no problem with our paper warping or pilling).
- Load a small amount of color onto the brush to begin painting. Allow the color to dry before adding more color. More intense color can always be added, but if too much color is in one spot initially, it is more difficult to spread or dilute it out.
- Too much water in one spot will cause regular cardstock to warp or pill, so make sure there is enough water to spread the color, but not too much that is changes the integrity of the paper.
- Using watercolor pencils and a blender pen, or watercolor brush, is another good way to color images without using inks. Color with the pencil and just add a little water to spread that color in the desired area.
- Another option to color images is by using the Stampin’ Up! markers, or ink pads, and a blender pen. A blender pen allows more control and more suited for use with regular cardstock.
- Practice, and practice. . .
Practicing more . . . Watercolor Technique
I had to stamp the “chairs on the deck” image, and practice my watercolor painting some more, after Connie left. I hauled out more ink pads for this. Again, I stamped the image with Stazon black ink, then began painting. Once dry, I cut the strip of cardstock to fit the front of the card base. This time, I embossed the front of the card base with the Tasteful Textile 3D embossing folder, then glued the chairs image directly to the card base. I liked the simple look and decided I would not embellish it any further. Sometimes, simple is best. After all, it was a relaxing day!
Seaside View Watercolor Painting Technique Supply List:
- Seaside View stamp set, item # 152651
- Stazon Jet Black Ink Pad, item # 101406
- Water Painters, item # 151298
- Blender Pens, item # 102845
- Classic Stampin’ pads and/or ink refills, found on pages 142 – 144 in the Annual Stampin’ Up! catalog; you choose the colors you like!
- Stampin’ Write Markers, found on page 144 in the Annual Stampin’ Up! catalog; again, you choose the colors!
- Watercolor Pencils, item # 141709
- Watercolor Pencils Assortment 2, item # 149014
- Cardstock, Whisper White, item # 100730, or Very Vanilla, item # 101650
- Fluid 100 Watercolor Paper, item # 149612
- You’ll have to supply your own water and a rag (smile)
Beautiful! Thanks for the watercoloring tips!
You’re welcome! I hope they are helpful.