
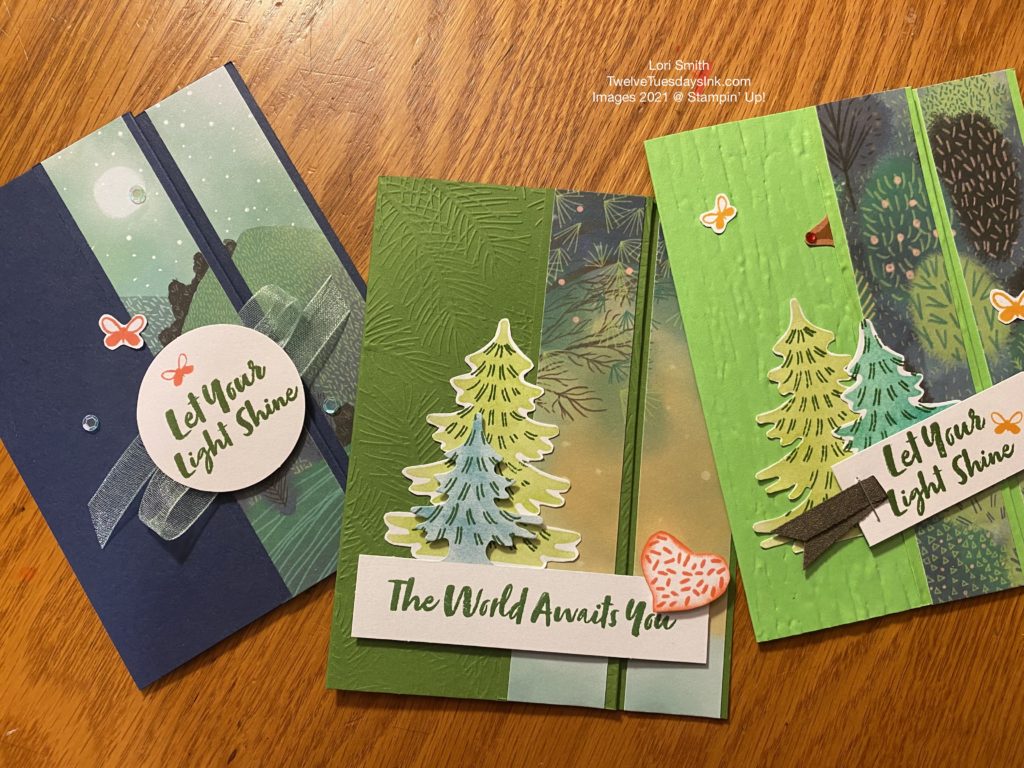
What fun the The Adventure Begins Paper Pumpkin Kit is! And to think that my adventures with the stamp set, and kit parts are only just beginning! Here’s a simple alternative project idea, if you’d like to stretch the pieces of the kit just a bit more. I have 3 cards that use the same layout, but with different scenes from the card bases to share, today. Let the adventure begin!
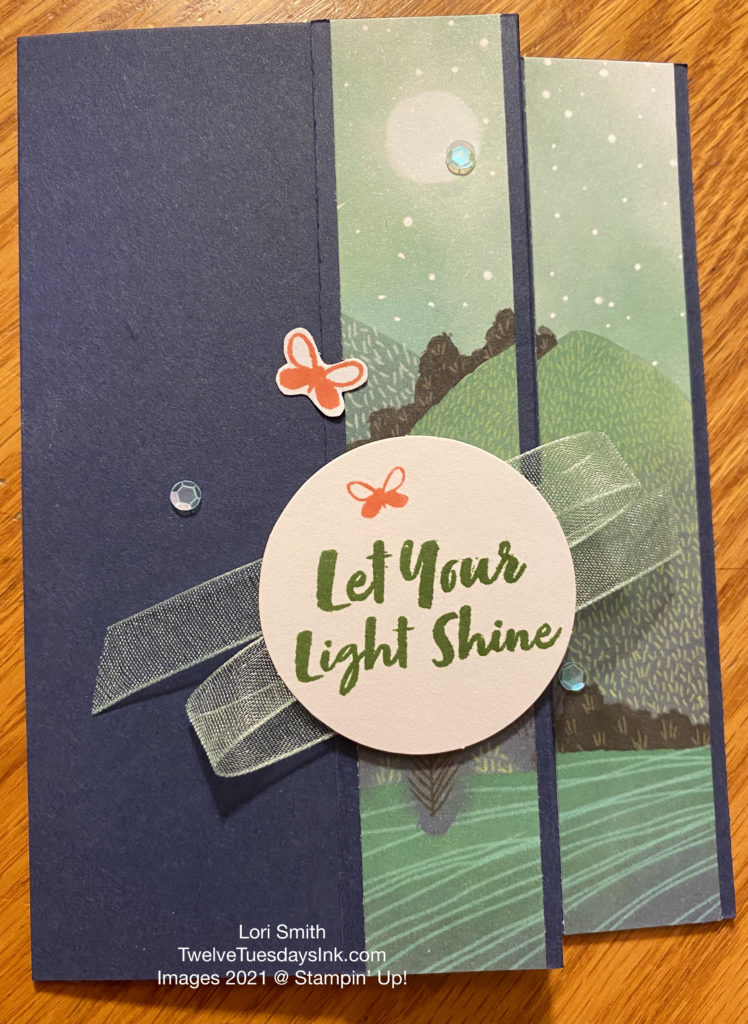
The Adventure Begins – Act 1
I have to admit that this layout came about because of a stamping mistake I made months ago. Yes, a stamping blooper, and we all make them. This Spring I stamped on a card base while I was using the Sweet Strawberry stamp set. When I stamped, some of the flowers weren’t in the right place and not even clear images. Ugh! But, I still save those card bases that I mess up and try to recycle or reuse the cardstock for other things, so I threw it in a drawer.
Then I saw a card style I haven’t made in a long time and tried it on the messed up card base. Part of the card front is folded back and glued onto itself, to expose a design, or in this case, Designer Series Paper (DSP) attached on the inside. It turned out to be the perfect blooper cover up and Happy Birthday card!
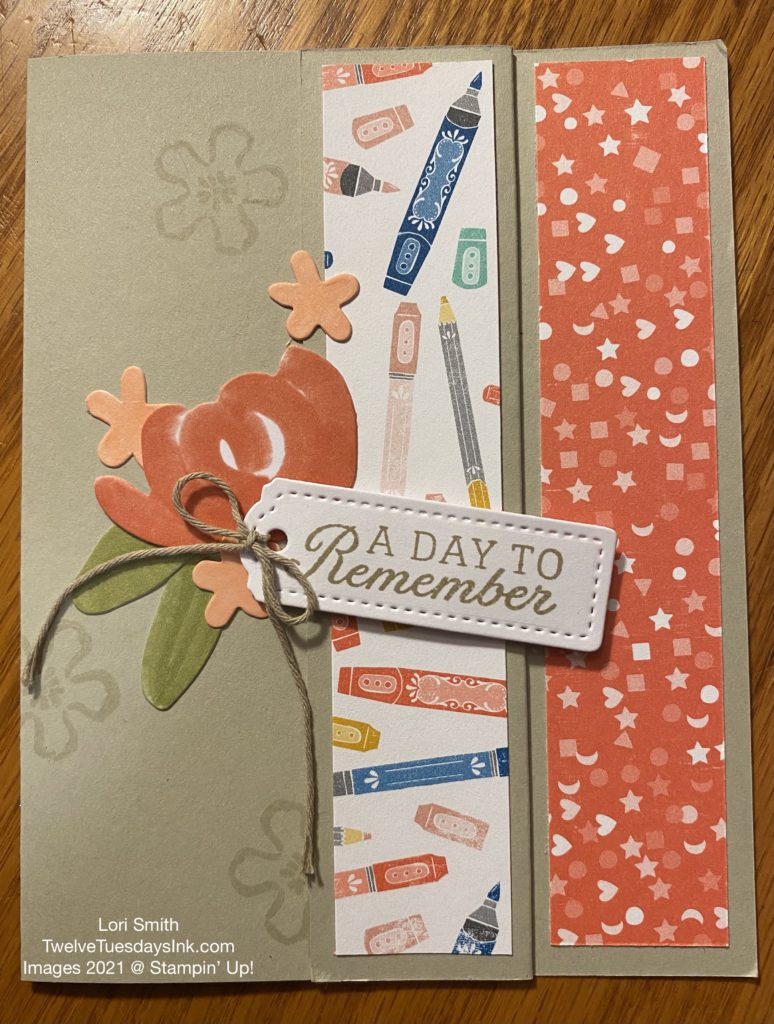
You may even have some leftover stickers from a past Paper Pumpkin Kit, called Something for Everything, in December 2019. The tag was created with the new Tailor Made Tags dies, Days to Remember stamp set, and Baker’s Twine Essentials Pack. I was trying out some new annual catalog products! This is what inspired my alternate idea for the July Paper Pumpkin Kit.
Let the Adventure Begin – Act 2
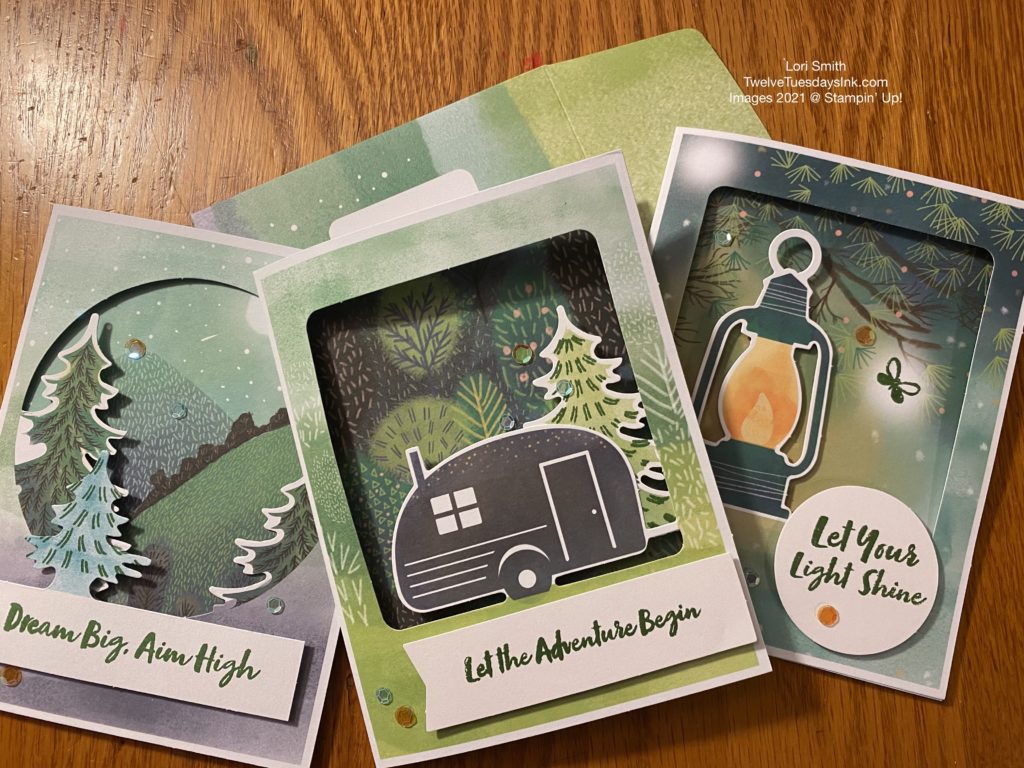
As you may already know, when my kit arrives, I always create a set of cards as the kit was designed to make. I shared one half of the kit with my mom. She loved this kit, by the way! I saved the last set of cards and parts to play with and make alternate projects. So, the first thing I did was to cut apart the three trifold cards, each into three pieces, and it gave me a total of nine parts – three “punch out” fronts, three nature scenes, and three solid white pieces of cardstock. I saw some demonstrators make shaker cards with the front pieces, and I will most likely make one myself. I want to use another front piece to decorate a mini paper pumpkin box, and if I get really ambitious, make a journal out of the box. We’ll see if I have enough time!
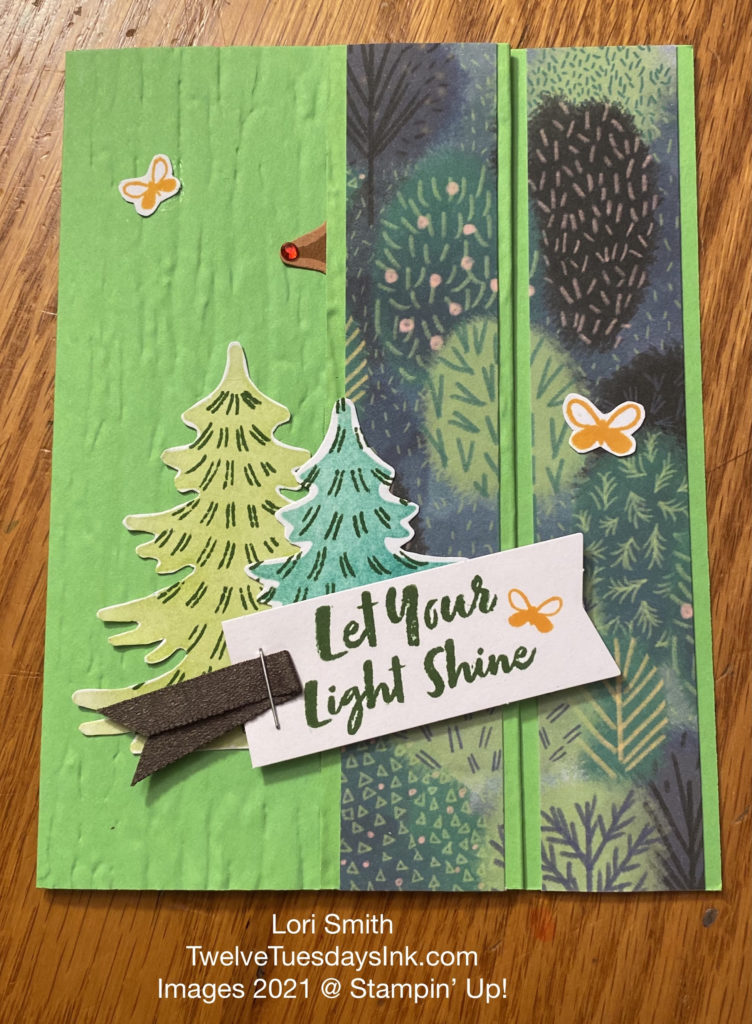
Let the Adventure Begin – Act 3
Oh, the ideas that are floating around in my head! How can I use the pretty envelopes for a card or two? I’m inspired to try using the tree stamp with the colors of the whimsical trees suite, in the July to December 2021 Mini Catalog. And then there’s a Christmas in July idea . . . I can’t possibly share them all because you do not have enough time, and I need to focus!!
Let’s Make This Card Layout
To be honest, I can’t tell you if this layout goes by a particular title. I didn’t try to look for it, because I don’t even know how to begin this search. But it’s a simple layout that gives a lot of interest (or cover up a mistake), and I like that!
Let your adventure begin. Use the picture to give you an idea of how I cut the card apart to make this alternate card.
- Like I mentioned before, cut the trifold panels, from one card, apart. As a result, you are left with a “punch out” front, an all white panel, and another scene from the inside panel. Set aside the “punch out” front part, and use it for another project.
- Take one inside scene and cut into three strips: Two strips measure 1″ wide and a third strip remains that measures 2-1/8″ wide. Save the wider strip for another project. Use the two 1″ strips to make this card.
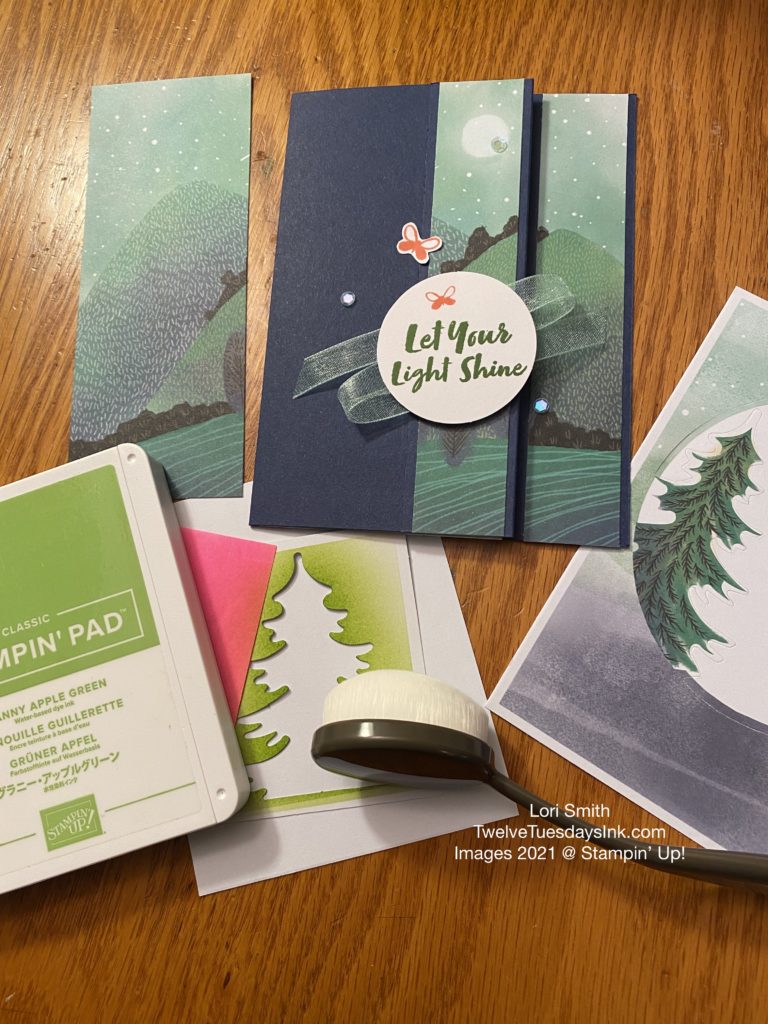
- Get out your blending brush, ink pad, and some sticky notes! I saved the pieces that I punched the trees from and used them as stencils to make more trees on the white cardstock. (I used two of the three white cardstock pieces from the cards that I cut apart). Then I fussy cut the trees, because I needed more trees for the other cards. (Also, save any leftovers to make more banners, labels, etc).
Begin Card Assembly
- Choose a coordinating color of cardstock for your card base and cut it to measure 8-1/2″ x 5-1/2″. Then score on the long side at 4-1/4″ and 7-1/4″.
- This step is optional. Emboss the card front panel using an embossing folder or stamp a background design.
- Fold the card on the 4-1/4″ score line to make a “v” shape. Then fold on the other score line, so the right edge of the cardstock is moving back towards the center fold to make a 1-1/4″ flap. Now, this shape should look like a very lopsided “z” and the card front measures 3″ wide after the flap is folded back. Set aside.
- Stamp a sentiment on the label, or tag, and any other trees, hearts, and butterflies to embellish.
- Practice your layout without adhering anything, first! Gather the tag, a set of two 1″ scene strips, trees, ribbons, sequins, etc. and place them where you want them to be. Once, you are happy with that, then go to the next step.
- Adhere one of the 1″ strips to the 1-1/4″ flap of your card front, then glue the flap down to the card front base. Glue the other 1″ strip to the inside edge of the card. See below.
- Adhere the rest of your card front pieces, just as you practiced.
- Sit back and admire your finished project!
Get a Closer Look
Here’s another look at the three finished cards I made from the The Adventure Begins kit. The first card is the simpler version, and the next two use embossing folders to give more texture to the card fronts.
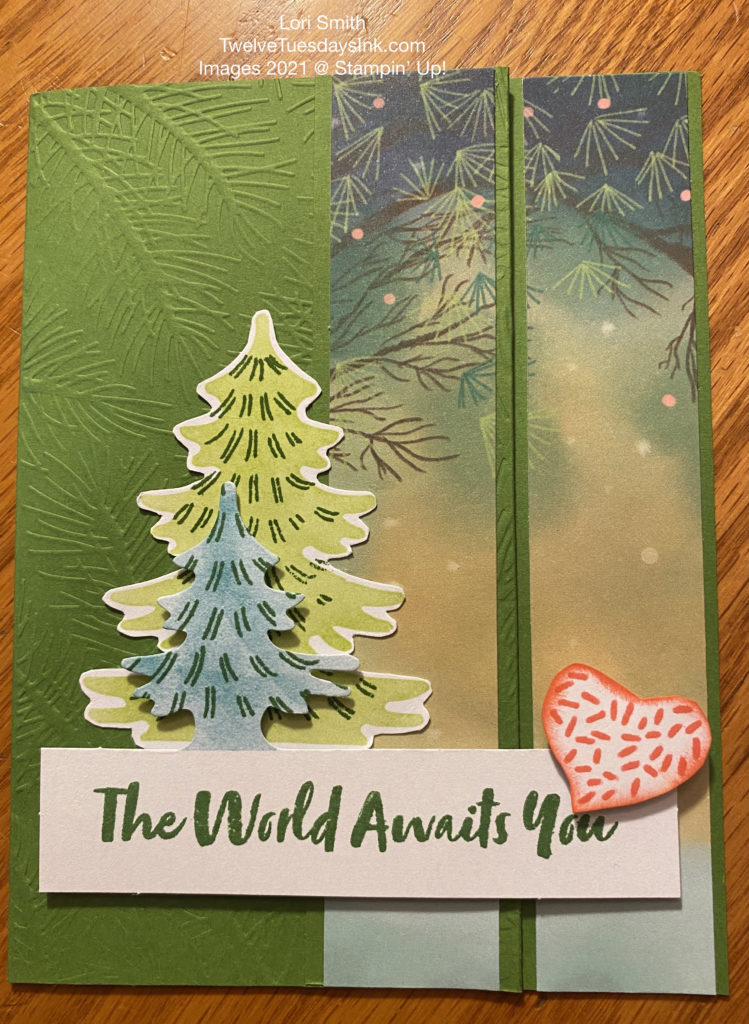
I couldn’t help myself, and my sense of humor took over, too . . .! It turns out that after the most eventful night, Rudolph was allowed to play in the reindeer games. Yes, the tree stamp in The Adventure Begins kit makes the perfect reindeer nose! I tucked his nose under the 1-1/4″ flap, before I glued it to the card front.
If you can get past my sense of humor, I do hope you enjoyed what I’ve shared. But this is my true idea of Christmas in July. . .
Let the Adventure Begin Supply List
I’ve listed some of the “extras” I used to make the featured cards. Use what you have already, or select the item number of a product below to view and learn more about it. As a result, you’ll be at my on-line store already, if you decide to purchase something. All of these items can be found in the May 2021 -April 2022 Annual Catalog.
- Sweet Strawberry stamp set, item # 158231
- Tailor Made Tags dies, item # 155563
- Baker’s Twine Essentials Pack, item # 155475
- Pool Party Sheer Ribbon, item # 152462
- Night of Navy cardstock, item # 100867
- Flirty Flamingo ink pad, item # 147052
- Garden Green cardstock, item # 102584
- Wintry 3D embossing folders, item # 155433
- Sponge Daubers,item # 133773
- Granny Apple Green cardstock, item # 146990
- Bark 3D embossing folder, item # 155431
- Granny Apple Green ink pad, item # 147095
- Bermuda Bay ink pad, item # 147096
- Mango Melody ink pad, item # 147093
- Early Espresso Faux Suede Trim, item # 152472
- Cinnamon Cider cardstock, item # 153078
- Cinnamon Cider ink pad, item # 153114
- Red Rhinestone Basic Jewels, item # 146924
- Paper Snips, item # 103579
August 2021 – Hope Box Kit
Now, if you missed out on the The Adventure Begins kit, it’s not too late to start your adventure and receive the next Paper Pumpkin Kit, the August 2021 Hope Box. This kit contains supplies to create nine full-sized cards with coordinating envelopes and comes in a special box. This box is especially designed to turn into a keepsake box – to add hope to your life, or in the lives of others. I plan to keep some memories in mine!

This color combination is beautiful – Bermuda Bay, Blackberry Bliss, Bumblebee, Melon Mambo, Petal Pink, Pool Party, and Poppy Parade. I wonder if there will be some beautiful butterflies, flowers and ribbon inside, too? Anyone interested has until August 10th to subscribe! Just click HERE.
So on that note, let your craft adventure begin by trying out this easy card layout, and subscribe if you haven’t already!
Really great ideas Lori! I especially like the one using the wintery embossing folder, thee tree branches look so good with your design!
Thanks, Julie! They were fun to make!